Reconfiguring Tmux
A Better Prefix Key
The first thing we are going to change is the prefix from ctrl b to ctrl s. If you haven’t already you will need to change your caps lock key to become a newly minted ctrl key. There are instructions how to do this in my Vim configuration post. In the tmux config file we must first tell tmux to stop using ctrl b. So the first thing we write is unbind C-b. The capital ‘c’ stands for ctrl. We then reset the prefix by inputting set -g prefix C-s. What that says is, “set, globally, the prefix to ctrl s”.
Now save this file with the Vim command :w. To make tmux source this file every time it runs, and put your edits into action we must run source-file. This is something that we run in the tmux prompt, which we access with prefix : (right now your prefix will still be ctrl b). The prompt appears at the bottom of your shell. In it we will type source ~/.tmux.conf and press enter. Now the new prefix of ctrl s is active. Try it out, split a window into two panes!
Quicker Source File Loading
It is going to be a pain to have to write source ~/.tmux.conf every time that we change something and source it, so let’s bind a key to automatically run that process. In the file write bind-key r source-file ~/.tmux.conf \; display-message "~/.tmux conf reloaded". This is saying, “bind the key r to source the file that is ~/.tmux.conf and when this is done display the message that it is reloaded”. We must use prefix : and source ~/.tmux.conf once to get it started, but after that we will be able to use prefix r to reload the config file any time we like.
Forward Incremental Search
Before we made ctrl s the prefix, it was actually already a command in tmux called “Forward Incremental Search”. What if we want to use this one day? We can input bind-key -r C-s send-prefix. This will send the prefix so that if we were to again type ctrl s it will now stand for forward incremental search. The -r means that instead of needing to type ctrl s twice every time that we want the forward incremental search to increment, we type the prefix once and then every single following ctrl s will increment.
Direction Keys
Have you noticed, when you have more than one pane in a window, that using prefix o to cycle around panes until you have reached your destination is a bit of a drag? We could bind keys to make new commands so that we can move up, down, left, right between panes. Super!
Let’s input bind-key -n C-h select-pane -L. This creates a command ctrl h, that selects a pane to the left. You will notice this matches the Vim direction commands. That’s handy. The -n is allowing binding of keys without the needing the prefix first. The -L tag stands for “left”. So knowing this we can also make bind-key -n C-j select-pane -D to use ctrl j to move down, bind-key -n C-k select-pane -U to use ctrl k to move up and bind-key -n C-l select-pane -R to use ctrl l to move right.
Now reload the source-file, open multiple panes and try out your new commands!
Moving Within Tmux Pane
When you use the terminal normally, you are able to scroll up and down to see previous commands and processes. When using tmux you can’t do this. That might be a problem when you are running a test with rspec for example, and you can’t see the entire error message, or prints to the console.
Thankfully we can set our configuration file to use Vim keys when moving around the buffer, which will work when we are in copy mode. To enable it add setw -g mode-keys vi to your config file, then reload source-file. To enter copy mode press prefix [. Now you can use j,k,h,l to move around the buffer! To exit copy mode simply hit q.
Stylin’
If you badly desire to change the colour of the status bar at the bottom of your terminal from that blinding-fluorescent-green that comes with tmux, then you are in luck. Use set -g status-bg and then a hex-code of your choice in single quotes. That might be set -g status-bg '#858585'. Similarly you can re-set the colour of the text in the status bar using set -g status-fg '#89457c'.
You may also like to set a max length for the left side of the status bar. This is so that it doesn’t get too busy with text down there. Add this to your config file - set -g status-left-length 50. Remember to reload the source-file to see these changes.
Extra Features
Add a battery charge percentage to your status bar. You can install it using homebrew and find it on Nicolas Goles Github. Then add it to the right of your status bar in your config file with set -g status-right " #(battery -t) ".
Add the time to your status bar as well by adding #(date '+%a, %b %d - %I:%M') inside the double quotes next to battery. Hey look, it’s those time directives again!
Reload the source-file a final time to see your especially good-looking and informative new status bar.
After following all of these steps, your configuration file will look like this:
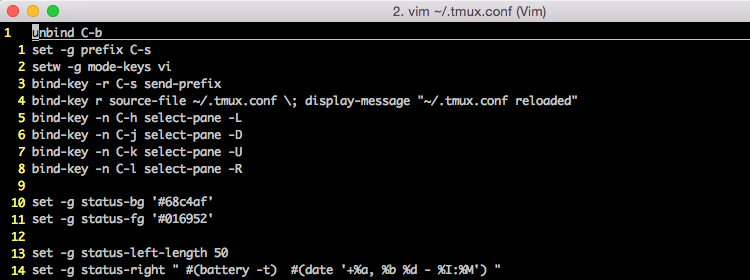
Happy days!